
You must know that social media has a very important position in modern life - every thing can be shared on social network.
One of the largest and most famous social network is Facebook. Integrate with Facebook to help you build engaging social apps and get more installs.
In this post, I’ll show you every steps in Facebook SDK integration in Android to let user login, post a status or a photo to his timeline.
A - Create Facebook App
Firstly, go to Facebook Developer Console page, select Apps –> Add New App to create a new Facebook app.
Pick desired platform and enter your app name, pick app category.
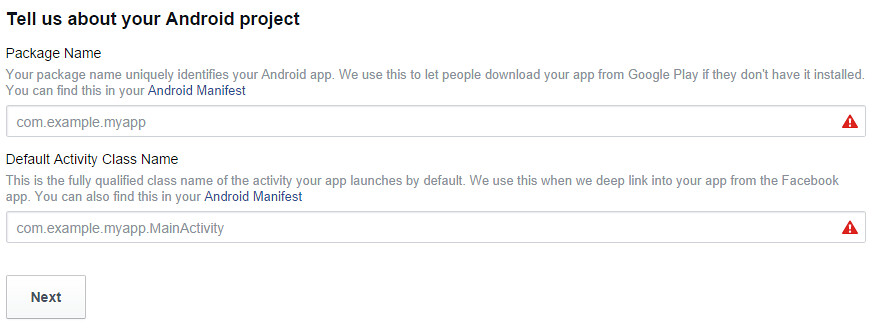
Then, enter the package name and default Activity class name of your Android app:
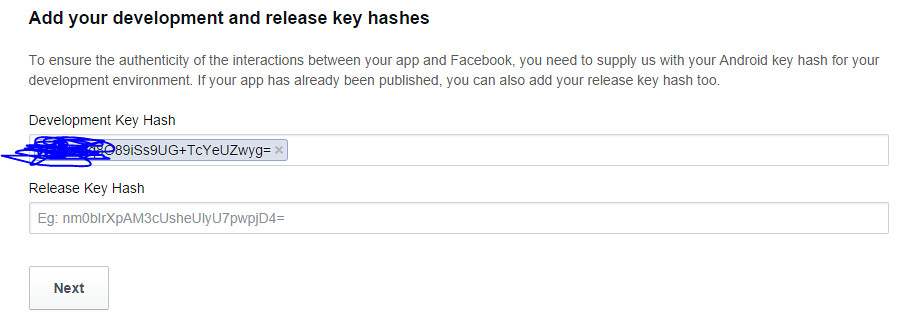
Next, enter your key hashes for the development and release version.
I’ll show you how to get development key hash in the next section.
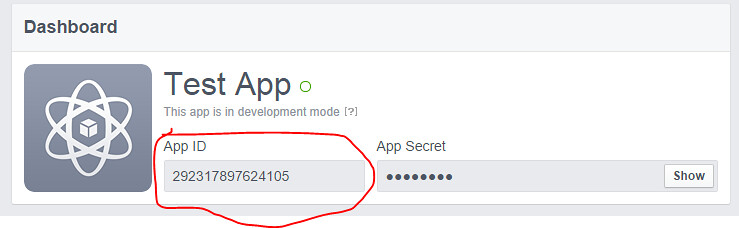
After finished all those steps, you’re done with creating new Facebook app and can view the App ID and App Secret key also.
B - Generate Key Hash for Facebook settings
For the “original” way, you can prefer this link and follow all the steps to get the key hash.
If you’re not a huge fan of cmd (like me  ), just put the following code snipet in your Main Activity and get the key hash from log cat:
private void getKeyHash(){
	PackageInfo info;
	try {
		info = getPackageManager().getPackageInfo("ice.tea09.demofacebooksdk", PackageManager.GET_SIGNATURES);
		for (Signature signature : info.signatures) {
			MessageDigest md;
			md = MessageDigest.getInstance("SHA");
			md.update(signature.toByteArray());
			String something = new String(Base64.encode(md.digest(), 0));
			Log.e("hash key", something);
		}
	} catch (NameNotFoundException e1) {
		Log.e("name not found", e1.toString());
	} catch (NoSuchAlgorithmException e) {
		Log.e("no such an algorithm", e.toString());
	} catch (Exception e) {
		Log.e("exception", e.toString());
	}
}
C - Import Facebook SDK
You can download Facebook SDK from the Facebook Developer page.
After that, extract and import the SDK to eclipse.
Select File –> Import and pick General –> Existing Projects into Workspace

After that, browse to the Facebook SDK folder and selected disired projects:

To add Facebook SDK to your project, right click on your project, select Properties.
Pick Android and on the right side in Library section, click on Add button to select Facebook SDK project.
Finally, click OK and build your project.

D - Facebook SDK Integration in Android Demo
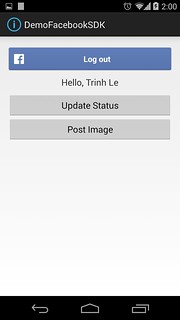
Now, every required settings is done. We can start on creating a demo project that integrated with Facebook SDK and allow user to login, post status, photos to his time line.
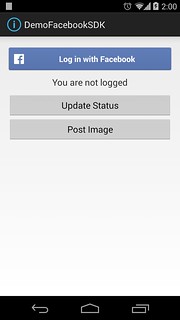
1 - Demo app layout
Firstly, we made a very simple layout with 3 buttons:
- Login
- Update Status
- Post Image
activity_main.xml
<LinearLayout xmlns:android="http://schemas.android.com/apk/res/android"
    xmlns:tools="http://schemas.android.com/tools"
    xmlns:facebook="http://schemas.android.com/apk/res-auto"
    android:layout_width="match_parent"
    android:layout_height="match_parent"
    android:orientation="vertical"
    android:paddingBottom="@dimen/activity_vertical_margin"
    android:paddingLeft="@dimen/activity_horizontal_margin"
    android:paddingRight="@dimen/activity_horizontal_margin"
    android:paddingTop="@dimen/activity_vertical_margin"
    tools:context="ice.tea09.demofacebooksdk.MainActivity" >

    <com.facebook.widget.LoginButton
        android:id="@+id/fb_login_button"
        android:layout_width="fill_parent"
        android:layout_height="wrap_content"
        android:layout_marginTop="5dp"
        facebook:confirm_logout="false"
        facebook:fetch_user_info="true" />

    <TextView
        android:id="@+id/tv_username"
        android:layout_width="wrap_content"
        android:layout_height="wrap_content"
        android:layout_gravity="center"
        android:layout_margin="10dp"
        android:textSize="18sp" />

    <Button
        android:id="@+id/btn_post_status"
        android:layout_width="match_parent"
        android:layout_height="wrap_content"
        android:text="Update Status" />

    <Button
        android:id="@+id/btn_post_photo"
        android:layout_width="match_parent"
        android:layout_height="wrap_content"
        android:text="Post Image" />

</LinearLayout>
As you can see, we use the LoginButton of Facebook SDK.
A Log In/Log Out button that maintains session state and logs in/out for the app. This control will create and use the active session upon construction if it has the available data (if the app ID is specified in the manifest). It will also open the active session if it does not require user interaction (i.e. if the session is in the SessionState.CREATED_TOKEN_LOADED state. Developers can override the use of the active session by calling the LoginButton.setSession(com.facebook.Session) method.
2 - Demo app implementation
Firstly, declare all inneed variables:
private LoginButton btnLogin;
private Button btnPostPhoto;
private Button btnPostStatus;
private TextView tvUsername;
private UiLifecycleHelper uiHelper;
GraphUser user;
private static final List<String> FACEBOOK_PERMISSIONS = Arrays.asList("publish_actions");
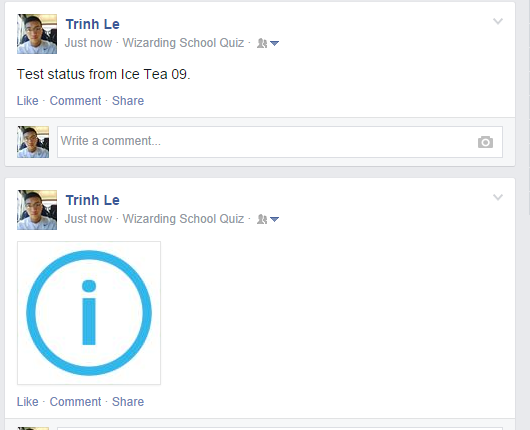
private static String testStatus = "Test status from Ice Tea 09.";
The UiLifecycleHelper object used to to create, automatically open (if applicable), save, and restore the Active Session in a way that is similar to Android UI lifecycles.
@Override
protected void onCreate(Bundle savedInstanceState) {
	super.onCreate(savedInstanceState);

	uiHelper = new UiLifecycleHelper(this, statusCallback);
	uiHelper.onCreate(savedInstanceState);

	setContentView(R.layout.activity_main);

}

private Session.StatusCallback statusCallback = new Session.StatusCallback() {
	@Override
	public void call(Session session, SessionState state,
			Exception exception) {
		if (state.isOpened()) {
			Log.d("MainActivity", "Facebook session opened");
		} else if (state.isClosed()) {
			Log.d("MainActivity", "Facebook session closed");
		}
	}
};

@Override
public void onResume() {
	super.onResume();
	uiHelper.onResume();
}

@Override
public void onPause() {
	super.onPause();
	uiHelper.onPause();
}

@Override
public void onDestroy() {
	super.onDestroy();
	uiHelper.onDestroy();
}

@Override
public void onActivityResult(int requestCode, int resultCode, Intent data) {
	super.onActivityResult(requestCode, resultCode, data);
	uiHelper.onActivityResult(requestCode, resultCode, data);
}

@Override
public void onSaveInstanceState(Bundle savedState) {
	super.onSaveInstanceState(savedState);
	uiHelper.onSaveInstanceState(savedState);
}
Next, we implement some functions like postPhoto(), postStatus(), checkPermissions() and requestPermissions():
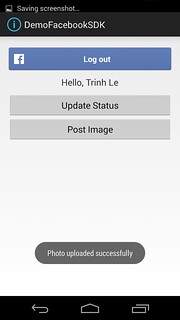
public void postPhoto() {
if(this.user != null){
if (checkPermissions()) {
Bitmap img = BitmapFactory.decodeResource(getResources(),
R.drawable.ic_launcher);
Request uploadRequest = Request.newUploadPhotoRequest(
Session.getActiveSession(), img, new Request.Callback() {
@Override
public void onCompleted(Response response) {
Toast.makeText(MainActivity.this,
"Photo uploaded successfully",
Toast.LENGTH_LONG).show();
}
});
uploadRequest.executeAsync();
} else {
requestPermissions();
}
}
else{
Toast.makeText(MainActivity.this,
"Please login first!",
Toast.LENGTH_LONG).show();
}
}
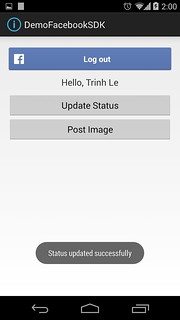
public void postStatus() {
if(this.user != null){
if (checkPermissions()) {
Request request = Request.newStatusUpdateRequest(
Session.getActiveSession(), testStatus,
new Request.Callback() {
@Override
public void onCompleted(Response response) {
if (response.getError() == null)
Toast.makeText(MainActivity.this,
"Status updated successfully",
Toast.LENGTH_LONG).show();
}
});
request.executeAsync();
} else {
requestPermissions();
}
}
else{
Toast.makeText(MainActivity.this,
"Please login first!",
Toast.LENGTH_LONG).show();
}
}
public boolean checkPermissions() {
Session s = Session.getActiveSession();
if (s != null) {
return s.getPermissions().contains("publish_actions");
} else
return false;
}
public void requestPermissions() {
Session s = Session.getActiveSession();
if (s != null)
s.requestNewPublishPermissions(new Session.NewPermissionsRequest(
this, FACEBOOK_PERMISSIONS));
}
Finally, update onCreate() method to call the desired functions properly:
@Override
protected void onCreate(Bundle savedInstanceState) {
	super.onCreate(savedInstanceState);
	uiHelper = new UiLifecycleHelper(this, statusCallback);
	uiHelper.onCreate(savedInstanceState);

	setContentView(R.layout.activity_main);

	tvUsername = (TextView) findViewById(R.id.tv_username);
	btnLogin = (LoginButton) findViewById(R.id.fb_login_button);
	btnLogin.setUserInfoChangedCallback(new UserInfoChangedCallback() {
		@Override
		public void onUserInfoFetched(GraphUser user) {
			MainActivity.this.user = user;
			if (user != null) {
				tvUsername.setText("Hello, " + user.getName());
			} else {
				tvUsername.setText("You are not logged");
			}
		}
	});

	btnPostPhoto = (Button) findViewById(R.id.btn_post_photo);
	btnPostPhoto.setOnClickListener(new OnClickListener() {

		@Override
		public void onClick(View view) {
			postPhoto();
		}
	});

	btnPostStatus = (Button) findViewById(R.id.btn_post_status);
	btnPostStatus.setOnClickListener(new OnClickListener() {

		@Override
		public void onClick(View v) {
			postStatus();
		}
	});

	getKeyHash();
}
Run the demo app and enjoy the result :)
E - Download Source Code Facebook SDK Integration in Android
https://drive.google.com/file/d/0Bw3dwdSezn6fSkxSbnhMcmd4UW8/view?usp=sharing
http://www.mediafire.com/download/lf90hvgyha9f7q2/DemoFacebookSDK.zip