
A - Introduction
Fragment is some kind of “small Activity”. It can be embed into an Activity and reused in others.
With Fragment, It’s easier for you to design multi-GUI for handset, tablet…

Fragment has its own sets of views, life cycle and can interact with the parent Activity.
B - Fragment life cycle
Fragment life cycle is affected directly by Activity life cycle. Ex: When parent Activity was Paused, all the children Fragment was Paused too.
This is Fragment life cycle diagram:

You usually implement 3 methods of Fragment life cycle:
- onCreate(): called when the Fragment was created. In this method, you should initialize all the essential components
- onCreateView(): called when the Fragment create its view. This method must return a view or null if there's no layout on the Fragment
- onPause(): called when the user leave Fragment. This is where you should implement to save data or information of current user session.
C - Demo
First, create a layout to load in Fragment.
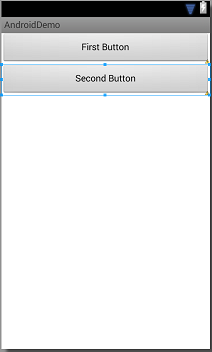
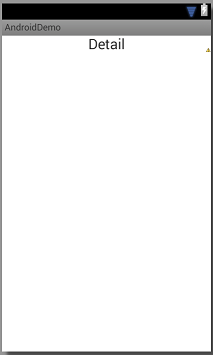
We need 2 layouts: list_fragment and detail_fragment
 | <?xml version="1.0" encoding="utf-8"?> <LinearLayout xmlns:android="http://schemas.android.com/apk/res/android" android:layout_width="match_parent" android:layout_height="match_parent" android:orientation="vertical" > <TextView android:id="@+id/textView1" android:layout_width="fill_parent" android:layout_height="wrap_content" android:gravity="center_horizontal" android:text="Detail" android:textAppearance="?android:attr/textAppearanceLarge" /> </LinearLayout> |
 | <?xml version="1.0" encoding="utf-8"?> <LinearLayout xmlns:android="http://schemas.android.com/apk/res/android" android:layout_width="match_parent" android:layout_height="match_parent" android:orientation="vertical" > <Button android:id="@+id/button1" android:layout_width="fill_parent" android:layout_height="wrap_content" android:text="First Button" /> <Button android:id="@+id/button2" android:layout_width="fill_parent" android:layout_height="wrap_content" android:text="Second Button" /> </LinearLayout> |
After that, create classes to inflate Fragment layouts:
ListFragment class:
public class ListFragment extends Fragment {

    @Override
    public void onCreate(Bundle arg0) {
        super.onCreate(arg0);
    }

    @Override
    public View onCreateView(LayoutInflater inflater, ViewGroup container, Bundle savedInstanceState) {
        View v = inflater.inflate(R.layout.list_fragment, container, false);
        return v;
    }

}
DetailFragment class:
public class DetailFragment extends Fragment {

    @Override
    public void onCreate(Bundle arg0) {
        super.onCreate(arg0);
    }

    @Override
    public View onCreateView(LayoutInflater inflater, ViewGroup container, Bundle savedInstanceState) {
        View v = inflater.inflate(R.layout.detail_fragment, container, false);
        return v;
    }

}
Adding Fragment to an Activity
<LinearLayout xmlns:android="http://schemas.android.com/apk/res/android"
    android:layout_width="fill_parent"
    android:layout_height="fill_parent"
    android:orientation="vertical" >

    <fragment
        android:layout_width="wrap_content"
        android:layout_height="wrap_content"
        android:id="@+id/fragmentList"
        android:name="ice.tea09.androiddemo.ListFragment" />

    <fragment
        android:layout_width="wrap_content"
        android:layout_height="wrap_content"
        android:id="@+id/fragmentDetail"
        android:name="ice.tea09.androiddemo.DetailFragment" />

</LinearLayout>
In parent Activity, we can interact with each Fragment and controls in it:
- Get the fragment by its id:
fragmentList =(ListFragment) getFragmentManager().findFragmentById(id.fragmentList);
fragmentDetail =(DetailFragment) getFragmentManager().findFragmentById(id.fragmentDetail);
- Get the controls in a Fragment:
btnFirst = (Button)fragmentList.getView().findViewById(id.button1);
btnSecond = (Button)fragmentList.getView().findViewById(id.button2);
Below is all the code in FragmentActivity:
public class FragmentActivity extends Activity {

    ListFragment fragmentList;
    DetailFragment fragmentDetail;
    Button btnFirst;
    Button btnSecond;
    TextView lbDetail;

    @Override
    protected void onCreate(Bundle savedInstanceState) {
        super.onCreate(savedInstanceState);
        setContentView(R.layout.activity_fragment);

        fragmentList =(ListFragment) getFragmentManager().findFragmentById(id.fragmentList);
        fragmentDetail =(DetailFragment) getFragmentManager().findFragmentById(id.fragmentDetail);

        btnFirst = (Button)fragmentList.getView().findViewById(id.button1);
        btnSecond = (Button)fragmentList.getView().findViewById(id.button2);
        lbDetail = (TextView)fragmentDetail.getView().findViewById(id.textView1);

        btnFirst.setOnClickListener(new OnClickListener() {

            @Override
            public void onClick(View v) {
                lbDetail.setText("Button First was clicked!");
            }
        });

        btnSecond.setOnClickListener(new OnClickListener() {

            @Override
            public void onClick(View v) {
                lbDetail.setText("Button Second was clicked!");
            }
        });
    }

    @Override
    public boolean onCreateOptionsMenu(Menu menu) {
        // Inflate the menu; this adds items to the action bar if it is present.
        getMenuInflater().inflate(R.menu.main, menu);
        return true;
    }
}
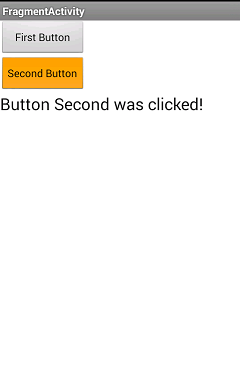
The result of this demo:
Source code:
https://drive.google.com/file/d/0BzvV1wN-WHWwZUZQeG1BODhRSnM/edit?usp=sharing