
In the previous blog post, I shared the guide to use Hilt to implement dependency injection in Android.
But there’s the fact that it’s not many chances for you to use Hilt in a project from the start. In most cases, you’ll have to migrate gradually from the legacy dependency injection library to Hilt. Also, there’s a high chance that dependency injection library is Dagger.
In this post, I’ll share a step-by-step guide to migrate from Dagger to Hilt gradually. Those were my personal experience when I tried to use Hilt in my side project — Buckist.
Also, I assume that you already have knowledge of Dagger and basic usage of Hilt.
1. Review the current project
Before doing any migrations, sit back and take an overall look at the current project.
The sample app is pretty simple, with 2 screens:
- Login
- Profile
All the data are mocked, and implementation is simplified to a minimum to save me from laziness and procrastination 🥲.

For the implementation details:
- I apply a simple Clean Architecture approach.
- Use Dagger for dependency injection (of course 😂) with AndroidInjection support.

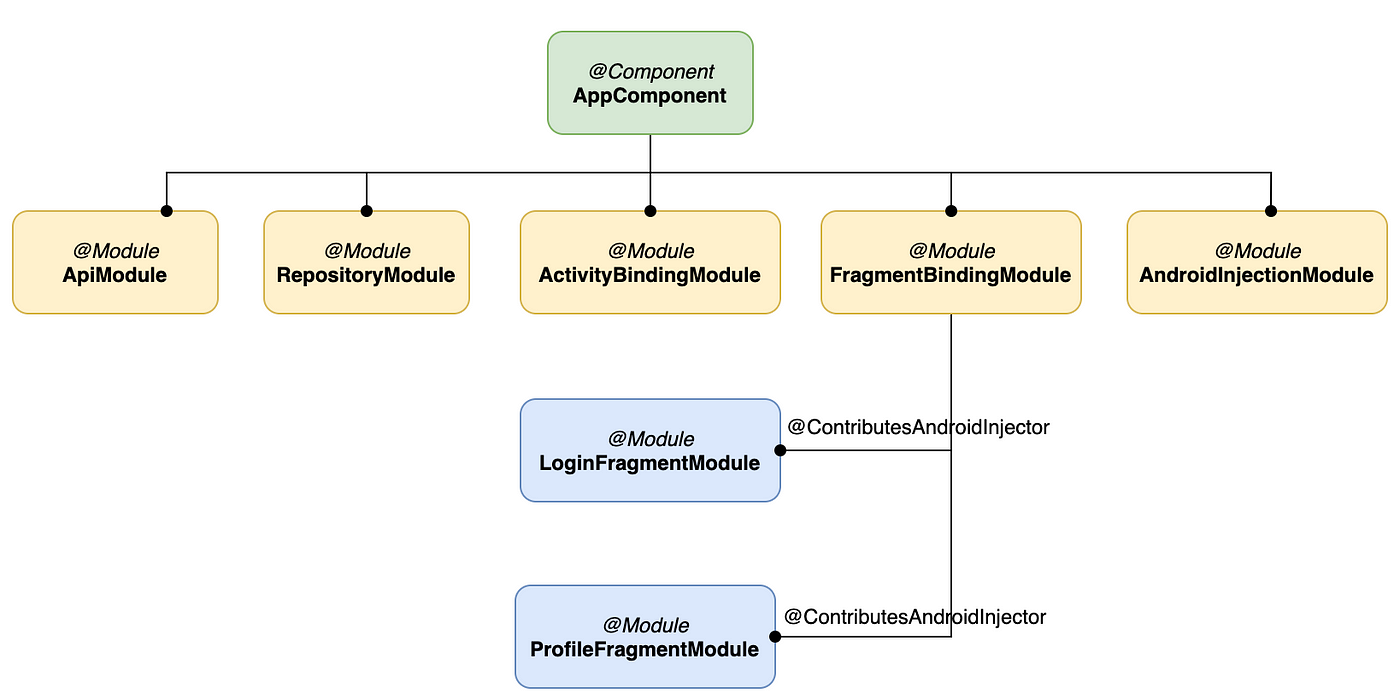
Also, because the main purpose of this post is migrating from Dagger to Hilt, I’ll visualize the Dagger components and modules relationship of this sample project for easier following:
2. Plan the migration
“A goal without a plan is just a wish.“ (Antoine de Saint-Exupéry)
After reviewing the current situation and before getting your hand dirty, you probably want to have a migration plan first.
What should we plan?
- The component hierarchy equivalent: you must have a crystal clear idea of which component your app will map with which Hilt component.
- The migration journey: which modules/components/activities/fragments should be migrated first or last. This depends on your particular project.
For this demo migration plan, the component hierarchy mapping is pretty straightforward:
AppComponentwill map toSingleComponentin Hilt.LoginFragmentModuleandProfileFragmentModulewill be installed intoFragmentComponent
Also, for the demo purpose, I’ll migrate the LoginFragment to Hilt first while keeping Dagger in the ProfileFragment to show you how to gradually migrating to Hilt piece by piece.
3. Migrate AppComponent Dependencies
The goal of this stage is to migrate all dependencies in AppComponent to SingletonComponent while keeping interop with legacy Dagger implementation everywhere else.
Install all the Modules into SingletonComponent
To do this, put the annotation @InstallIn(SingletonComponent::class) on top of the module class.
If you have too many modules, you can create an aggregator module that includes all the existing modules for temporary.
Remove existing AppComponent :
1
2
3
4
5
6
7
8
9
10
11
12
13
14
15
16
17
18
19
@Component(
    modules = [
        ApiModule::class,
        RepositoryModule::class,
        AndroidInjectionModule::class,
        AndroidSupportInjectionModule::class,
        ActivityBindingModule::class,
        FragmentBindingModule::class,
    ]
)
interface AppComponent {

    fun inject(app: App)

    @Component.Builder
    interface Builder {
        fun build(): AppComponent
    }
}
Replaced by AppAggregatorModule :
1
2
3
4
5
6
7
8
9
10
11
12
@InstallIn(SingletonComponent::class)
@Module(
    includes = [
        ApiModule::class,
        RepositoryModule::class,
        AndroidInjectionModule::class,
        AndroidSupportInjectionModule::class,
        ActivityBindingModule::class,
        FragmentBindingModule::class,
    ]
)
interface AppAggregatorModule
Update Application class
Now we can set up Hilt for the application class. Add the @HiltAndroidApp and remove the DaggerAppComponent.create().inject(this) inside the onCreate() and we’re good to go.
1
2
3
4
5
6
7
8
@HiltAndroidApp
class App : Application(), HasAndroidInjector {

    @Inject
    lateinit var dispatchingAndroidInjector: DispatchingAndroidInjector<Any>

    override fun androidInjector(): AndroidInjector<Any> = dispatchingAndroidInjector
}
As you can see, we still keep the HasAndroidInjector implementation. Because we want to continue support Dagger while migrating to Hilt gradually.
After finishing the migration, you can go back and remove this code.
Now let’s rebuild the project 🔄
Bam! Android Studio will throw this error right into your face 💥

Basically, Hilt requires all the modules to have the @InstallIn annotation to be declared.
To skip this fatal warning during the migration, add this line into your app/build.gradle and remember to remove it after finishing the migration.
1
2
3
4
5
6
7
8
android {

    defaultConfig {
        //TODO: remove this after migration to Hilt
        javaCompileOptions.annotationProcessorOptions.arguments['dagger.hilt.disableModulesHaveInstallInCheck'] = 'true'
    }

}
Clean then rebuild, and you’re good to go! 🎯
4. Migrate Activities / Fragments
After migrated the AppComponent dependencies, now you can start gradually migrating Activity and Fragment within the application.
Migrate Activity that uses AndroidInjection
For the Activity that currently use AndroidInjection, the migration will be pretty straightforward.
First, add @InstallIn(ActivityComponent::class) annotation into the ActivityModule class:
1
2
3
4
5
6
@͟I͟n͟s͟t͟a͟l͟l͟I͟n͟(͟A͟c͟t͟i͟v͟i͟t͟y͟C͟o͟m͟p͟o͟n͟e͟n͟t͟:͟:͟c͟l͟a͟s͟s͟)͟
@Module
abstract class MainActivityModule {
    @Binds
    abstract fun checkAppUpdateUseCase(impl: CheckAppUpdateUseCaseImpl): CheckAppUpdateUseCase
}
Remove the @ContributesAndroidInjector of that Activity in the ActivityBindingModule :
1
2
3
4
5
6
@Module
abstract class ActivityBindingModule {

  ̶@̶C̶o̶n̶t̶r̶i̶b̶u̶t̶e̶s̶A̶n̶d̶r̶o̶i̶d̶I̶n̶j̶e̶c̶t̶o̶r̶(̶m̶o̶d̶u̶l̶e̶s̶ ̶=̶ ̶[̶M̶a̶i̶n̶A̶c̶t̶i̶v̶i̶t̶y̶M̶o̶d̶u̶l̶e̶:̶:̶c̶l̶a̶s̶s̶]̶)̶a̶b̶s̶t̶r̶a̶c̶t̶ ̶f̶u̶n̶ ̶m̶a̶i̶n̶A̶c̶t̶i̶v̶i̶t̶y̶(̶)̶:̶ ̶M̶a̶i̶n̶A̶c̶t̶i̶v̶i̶t̶y̶

}
Add the @AndroidEntryPoint annotation on the top of the Activity class and remove the AndroidInjection.inject(this) :
1
2
3
4
5
6
@͟A͟n͟d͟r͟o͟i͟d͟E͟n͟t͟r͟y͟P͟o͟i͟n͟t͟
class MainActivity : AppCompatActivity(), HasAndroidInjector {
    override fun onCreate(savedInstanceState: Bundle?) {
         ̶A̶n̶d̶r̶o̶i̶d̶I̶n̶j̶e̶c̶t̶i̶o̶n̶.̶i̶n̶j̶e̶c̶t̶(̶t̶h̶i̶s̶)̶
    }
}
That’s it! You just finished migrating an Activity ! 🎉 Easy peasy, right?
Migrate Fragment that uses AndroidSupportInjection
The migration for Fragment is pretty similar to the Activity one.
First, add @InstallIn(FragmentComponent::class) annotation into the FragmentModule class:
1
2
3
4
5
@͟I͟n͟s͟t͟a͟l͟l͟I͟n͟(͟F͟r͟a͟g͟m͟e͟n͟t͟C͟o͟m͟p͟o͟n͟e͟n͟t͟:͟:͟c͟l͟a͟s͟s͟)͟
@Module
class LoginFragmentModule {
    ...
}
Then, remove the @ContributesAndroidInjector of that Fragment in the FragmentBindingModule :
1
2
3
4
5
6
7
@Module
abstract class FragmentBindingModule {

     ̶@̶C̶o̶n̶t̶r̶i̶b̶u̶t̶e̶s̶A̶n̶d̶r̶o̶i̶d̶I̶n̶j̶e̶c̶t̶o̶r̶(̶m̶o̶d̶u̶l̶e̶s̶ ̶=̶ ̶[̶L̶o̶g̶i̶n̶F̶r̶a̶g̶m̶e̶n̶t̶M̶o̶d̶u̶l̶e̶:̶:̶c̶l̶a̶s̶s̶]̶)̶
    ̶a̶b̶s̶t̶r̶a̶c̶t̶ ̶f̶u̶n̶ ̶l̶o̶g̶i̶n̶F̶r̶a̶g̶m̶e̶n̶t̶(̶)̶:̶ ̶L̶o̶g̶i̶n̶F̶r̶a̶g̶m̶e̶n̶t̶

}
Finally, go to the Fragment class, add the @AndroidEntryPoint annotation on the top and remove AndroidSupportInjection.inject(this) :
1
2
3
4
5
6
7
@͟A͟n͟d͟r͟o͟i͟d͟E͟n͟t͟r͟y͟P͟o͟i͟n͟t͟
class LoginFragment : Fragment() {
override fun onAttach(context: Context) {
        super.onAttach(context)
         ̶A̶n̶d̶r̶o̶i̶d̶S̶u̶p̶p̶o̶r̶t̶I̶n̶j̶e̶c̶t̶i̶o̶n̶.̶i̶n̶j̶e̶c̶t̶(̶t̶h̶i̶s̶)̶
    }
}
Clean + rebuild, and you’re good to go! 🚀
After finish migrating all the Fragment of an Activity , you can finally remove the HasAndroidInjector implementation.
1
2
3
4
5
6
7
8
9
@AndroidEntryPoint
class MainActivity : AppCompatActivity(),  ̶H̶a̶s̶A̶n̶d̶r̶o̶i̶d̶I̶n̶j̶e̶c̶t̶o̶r̶ {

     ̶@̶I̶n̶j̶e̶c̶t̶
     ̶l̶a̶t̶e̶i̶n̶i̶t̶ ̶v̶a̶r̶ ̶d̶i̶s̶p̶a̶t̶c̶h̶i̶n̶g̶A̶n̶d̶r̶o̶i̶d̶I̶n̶j̶e̶c̶t̶o̶r̶:̶ ̶D̶i̶s̶p̶a̶t̶c̶h̶i̶n̶g̶A̶n̶d̶r̶o̶i̶d̶I̶n̶j̶e̶c̶t̶o̶r̶<̶A̶n̶y̶>̶
    o̶v̶e̶r̶r̶i̶d̶e̶ ̶f̶u̶n̶ ̶a̶n̶d̶r̶o̶i̶d̶I̶n̶j̶e̶c̶t̶o̶r̶(̶)̶:̶ ̶A̶n̶d̶r̶o̶i̶d̶I̶n̶j̶e̶c̶t̶o̶r̶<̶A̶n̶y̶>̶ ̶{̶
        r̶e̶t̶u̶r̶n̶ ̶d̶i̶s̶p̶a̶t̶c̶h̶i̶n̶g̶A̶n̶d̶r̶o̶i̶d̶I̶n̶j̶e̶c̶t̶o̶r̶
    ̶}̶
}
5. Migrate ViewModel
Migration ViewModel is much easier.
Just need to put the @HiltViewModel annotation:
1
2
3
4
5
6
7
8
9
10
@͟H͟i͟l͟t͟V͟i͟e͟w͟M͟o͟d͟e͟l͟
class LoginViewModel @Inject constructor(
    private val loginUseCase: LoginUseCase
) : ViewModel() {

    fun login(username: String, password: String): LiveData<String> {
        return loginUseCase.execute(username, password)
    }

}
Remove all the ViewModelFactory implementations and ViewModel binding if any:
1
2
3
4
5
6
7
8
9
10
11
@InstallIn(FragmentComponent::class)
@Module
class LoginFragmentModule {

    @Provides
    fun loginUseCase(accountRepository: AccountRepository): LoginUseCase =
        LoginUseCaseImpl(accountRepository)

     ̶@̶P̶r̶o̶v̶i̶d̶e̶s̶
     f̶u̶n̶ ̶v̶i̶e̶w̶M̶o̶d̶e̶l̶(̶l̶o̶g̶i̶n̶U̶s̶e̶C̶a̶s̶e̶:̶ ̶L̶o̶g̶i̶n̶U̶s̶e̶C̶a̶s̶e̶)̶ ̶=̶ ̶L̶o̶g̶i̶n̶V̶i̶e̶w̶M̶o̶d̶e̶l̶(̶l̶o̶g̶i̶n̶U̶s̶e̶C̶a̶s̶e̶)̶
}
Install all the required dependencies into ViewModelComponent :
1
2
3
4
5
6
7
8
@͟I͟n͟s͟t͟a͟l͟l͟I͟n͟(͟V͟i͟e͟w͟M͟o͟d͟e͟l͟C͟o͟m͟p͟o͟n͟e͟n͟t͟:͟:͟c͟l͟a͟s͟s͟)͟
@Module
class LoginFragmentModule {

    @Provides
    fun loginUseCase(accountRepository: AccountRepository): LoginUseCase =
        LoginUseCaseImpl(accountRepository)
}
Retrieve the ViewModel instance when using:
1
private val viewModel: LoginViewModel by viewModels()
That’s all you need to do for migrating the ViewModel 👌
6. Migrate classes that use AppComponent for injection
We already covered the basic cases where you can use AndroidInjection , but there’re also many cases that you use the Component to inject the dependencies manually. This section will show you how to migrate those cases.
The idea is to replace the AppComponent injection by the Hilt EntryPoint .
First, create an EntryPoint that will act as your legacy AppComponent . This EntryPoint will have all the required inject() and exposed dependencies methods. You can let the EntryPoint implement the legacy Component for avoiding copy-code during the migration.
1
2
3
4
5
6
7
8
9
10
11
interface LegacyComponent {
    fun inject(activity: LegacyActivity)
    fun legacyRepositoty(): LegacyRepository
}
@InstallIn(SingletonComponent::class)
@EntryPoint
interface AppEntryPoint : LegacyComponent {

    fun inject(activity: DemoActivity)

}
Replace the AppComponent instance in Application :
1
2
3
class App : Application(), HasAndroidInjector {
    fun component(): AppComponent = component
}
By the new AppEntryPoint :
1
2
3
fun component(): AppEntryPoint {
    return EntryPoints.get(this, AppEntryPoint::class.java)
}
Then you can apply injection similar to using the legacy AppComponent :
1
2
3
4
5
6
7
class DemoActivity : AppCompatActivity() {

    override fun onCreate(savedInstanceState: Bundle?, persistentState: PersistableBundle?) {
        super.onCreate(savedInstanceState, persistentState)
        A͟p͟p͟.͟i͟n͟s͟t͟a͟n͟c͟e͟(͟)͟.͟c͟o͟m͟p͟o͟n͟e͟n͟t͟(͟)͟.͟i͟n͟j͟e͟c͟t͟(͟t͟h͟i͟s͟)͟
    }
}
7. Conclusion
In this post, I’m trying to share a guide that you can keep both Hilt and Dagger at the same time, make sure that you can migrate your project piece by piece.
Also, this post only cover the basic cases that you commonly found in most of Android projects. For more special cases like multi-modules, custom components,… we need more than a blog post to walk through.
Some small reminders to keep in mind when migrating:
- Migrate piece by piece
- Make sure to clean + build at regular check point to make sure you’re still on track
- Clean up legacy Dagger set up after migrated success
Please feel free to comment or have any feedbacks. Happy coding 💻!